Case Study: Hair Transplant – 8-Month Results from 2,500 Grafts for Norwood 3 Vertex Hair Loss
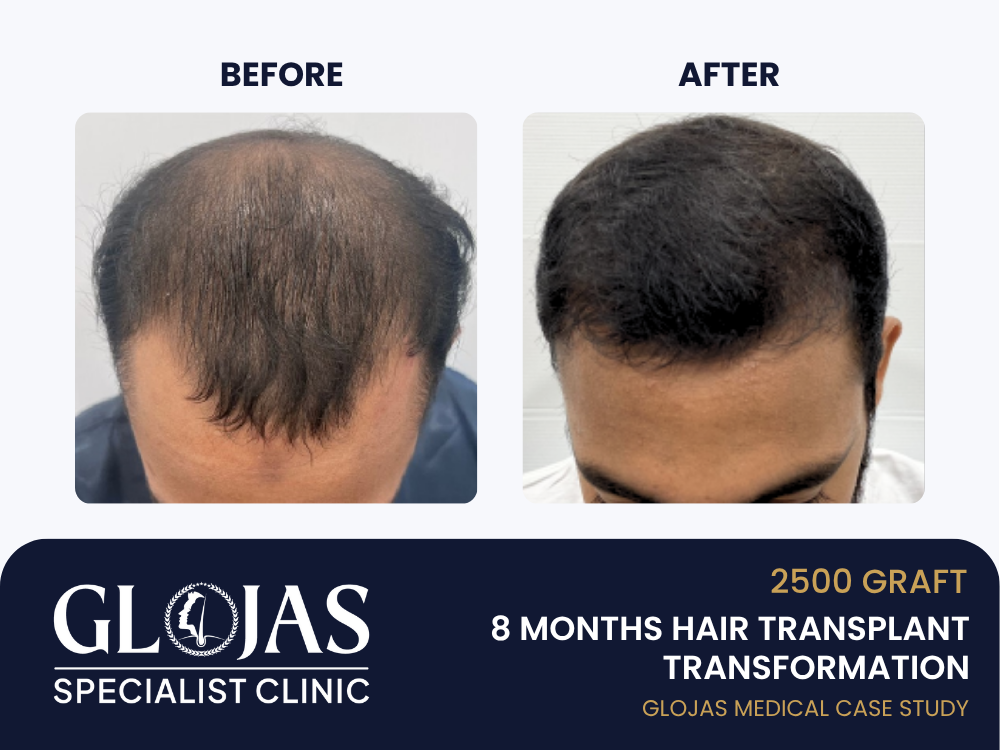
Hair loss in men often begins subtly—usually at the hairline or crown—and progresses over time, often unnoticed until a significant amount of hair is lost. For this 31-year-old male, the issue was Norwood 3 Vertex: a type of male pattern hair loss that affects both the temples and crown (vertex), giving the classic “M-shape” with visible scalp exposure at the back. This case study details how a SMART™ FUE Hair Transplant using 2,500 grafts successfully reversed visible thinning and restored volume in just 8 months—with natural, undetectable results. Patient Profile Name: Mr. R (identity protected) Age: 31 Diagnosis: Norwood 3 Vertex Hair Loss Zones: Receding frontal hairline, crown thinning Hair Type: Black, straight, medium thickness Donor Area: Occipital and parietal regions (back and sides of scalp) Mr. R had begun experiencing noticeable hair thinning at the age of 27. Over the next few years, the hairline receded further at the temples, and crown thinning became more apparent in photos and harsh lighting. His main concern was the loss of density at the crown and uneven hairline recession, which gave him an aged appearance. Why SMART™ FUE? SMART™ FUE (Scalp Micro-Advanced Restoration Technique) is a next-generation form of FUE hair transplantation, designed for: Higher graft survival rates (up to 95%) Minimal trauma during extraction Micro-angled implantation for natural hair growth direction Ideal for multi-zone hair loss, including temples, mid-scalp, and vertex No linear scars and fast recovery time For Mr. R, SMART™ FUE hair transplant was chosen to address two key areas: frontal hairline enhancement and crown restoration in one single session. Consultation & Treatment Plan – Hair Transplant During his consultation, a full trichoscopy and scalp mapping were performed. Key findings: Hairline recession was symmetrical with deep temple loss Crown showed diffuse thinning (~30% density remaining) Donor area was healthy and dense (85–90 grafts/cm²) Treatment Plan: 2,500 grafts total 1,200 grafts for frontal hairline and temple fill-in 1,300 grafts for crown density restoration Density goal: 40–45 grafts/cm² Goal: Seamless integration of new grafts with natural hair to avoid detection Procedure Summary Duration: 8 hours (1-day outpatient session)Anaesthesia: LocalTeam: Lead hair restoration surgeon + 2 techniciansTools Used: 0.8 mm micro-punch, sapphire blade Procedure Steps: Hairline design and crown whorl mapping Graft extraction from occipital region using SMART™ FUE Graft sorting under microscope (singles for hairline, doubles/triples for crown) Recipient site creation with sapphire blade at natural angles Implantation with custom implanters for optimal depth and direction Recovery Timeline Day 1–3: Minor swelling at forehead, redness around implanted zones Day 4–7: Formation of small scabs; gentle cleaning recommended Week 3: Shock loss phase (temporary graft shedding—normal) Month 3–4: Early signs of regrowth, especially in the hairline Month 6: Visible thickening in crown and temples Month 8: Significant density achieved, crown almost fully blended 8-Month Results Mr. R returned for follow-up at the 8-month mark and was extremely satisfied with the outcome. Results were natural-looking, with even density and a restored youthful profile. Area Before Transplant After 8 Months Frontal Hairline M-shaped recession, poor definition Strong contour, natural temple restoration Crown Thinning with visible scalp 80% coverage, volume restored Styling Wore hair forward to cover loss Open styling with fade haircut Confidence Avoided mirrors, photos More social, improved self-esteem Patient Feedback “I honestly didn’t expect to see this much growth in 8 months. The crown looks amazing, and my hairline actually suits my face now. SMART™ FUE was worth every cent.” Post-Procedure Maintenance Shampoo regimen: Mild, sulfate-free No finasteride taken due to personal preference PRP boosters advised every 6 months for longevity Follow-up review scheduled at 12 months 5 Frequently Asked Questions (FAQ) 1. Is 8 months enough to see full results? Not yet full, but 70–80% of the result is visible by month 8. Most patients see final density and texture maturity by 12 months. 2. Can SMART™ FUE fix both crown and hairline in one session? ✅ Yes. With adequate donor grafts, SMART™ FUE can restore multiple zones (e.g., temples + crown) in a single sitting with balanced results. 3. Is the crown more difficult to treat than the front? Yes. The crown requires more grafts for visual density due to spiral hair patterns, but with SMART™ FUE, results can still be excellent. 4. How do I know if I’m a candidate for 2,500 grafts? It depends on your hair loss level, donor area density, and goals. A specialist consultation is needed to assess your suitability. 5. Are the results permanent? ✅ Yes. The transplanted hair is resistant to DHT and, once grown, remains for life, behaving like natural hair in every way. Conclusion Mr. R’s case illustrates the effectiveness of SMART™ FUE Hair Transplant for Norwood 3 Vertex hair loss, even with just 2,500 grafts. In only 8 months, he gained a complete transformation—not only in appearance but also in confidence and quality of life. If you’re noticing thinning at the crown and temples, or want to take proactive steps before hair loss worsens, SMART™ FUE offers a minimally invasive, natural-looking, and permanent solution.
Hair Transplant Malaysia | Best Results & Cost of Hair Transplant in Malaysia
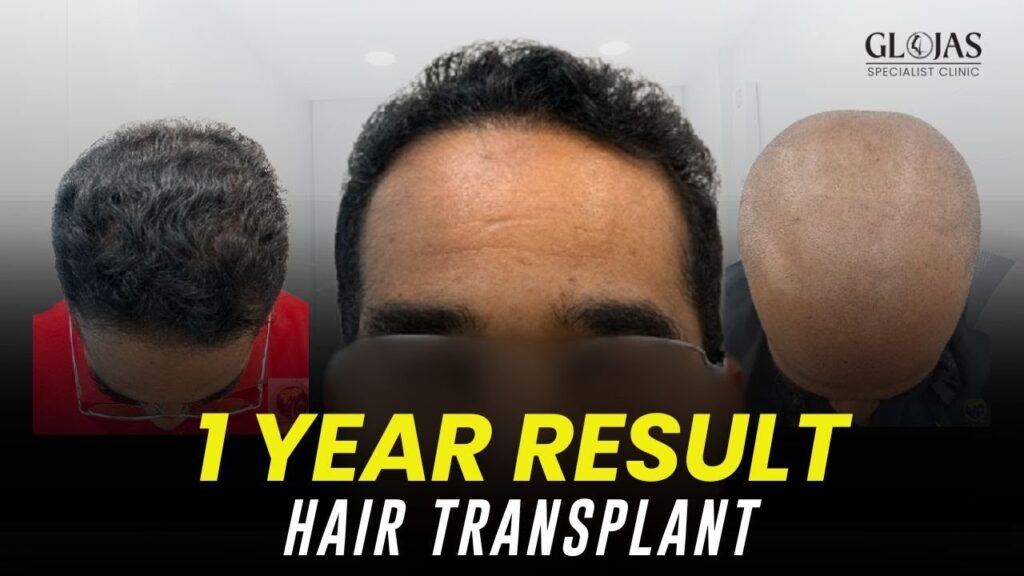
Considering a hair transplant but unsure about the results? Watch this patient’s inspiring journey and see how a professionally performed hair transplant can restore not only hair, but also confidence. From pre-procedure condition to post-operative transformation, this video showcases the power of modern hair restoration using proven techniques. Whether you’re facing male pattern baldness, a receding hairline, or thinning at the crown, this is your firsthand look at what to expect from a successful hair transplant experience. #HairTransplant #HairRestoration #FUEHairTransplant #HairLossSolution #BeforeAfterHair
Cara Mengecilkan Payudara: Pilihan Semula Jadi & Rawatan Profesional

Ramai wanita berdepan dengan isu payudara terlalu besar, bukan hanya dari sudut estetik tetapi juga dari segi kesihatan dan ketidakselesaan. Saiz payudara yang berlebihan boleh menyebabkan sakit belakang, kesukaran bersenam, postur yang lemah, serta rasa tidak selesa dalam aktiviti harian. Jika anda sedang mencari cara untuk mengecilkan payudara dengan selamat dan berkesan, artikel ini akan membincangkan pendekatan semula jadi, gaya hidup sihat serta rawatan klinikal yang tersedia. Punca Payudara Besar Sebelum merancang rawatan, penting untuk fahami punca saiz payudara yang besar: Faktor genetik Ketidakseimbangan hormon (estrogen tinggi) Pertambahan berat badan Kehamilan dan penyusuan Penggunaan ubat hormon tertentu Cara Semula Jadi untuk Mengecilkan Payudara 1. Senaman Kardio Senaman seperti jogging, berbasikal atau aerobik membantu membakar lemak secara keseluruhan, termasuk lemak di kawasan payudara. 2. Senaman Kekuatan Bahagian Atas Badan Latihan seperti push-up, dumbbell press, dan arm circles membantu menguatkan otot dada (pectoralis) dan memberikan sokongan lebih baik. 3. Pemakanan Sihat Amalkan diet rendah lemak, tinggi serat dan protein. Elakkan makanan bergula, berlemak tinggi atau diproses. 4. Kurangkan Berat Badan Penurunan berat badan secara keseluruhan akan mengurangkan saiz payudara kerana ia sebahagiannya terdiri daripada tisu lemak. 5. Kawal Hormon Stres, kurang tidur dan pemakanan tidak seimbang boleh menyebabkan gangguan hormon yang menjejaskan saiz payudara. Petua Tradisional (Tiada Bukti Klinikal Kuat) Sesetengah orang mencuba bahan seperti: Halba Daun sirih Jus lemon atau limau nipis Namun, keberkesanannya tidak terbukti secara saintifik dan hasilnya berbeza bagi setiap individu. Rawatan Profesional untuk Mengecilkan Payudara 1. Pembedahan Pengurangan Payudara (Breast Reduction Surgery) Dilakukan oleh pakar bedah estetik bertauliah Buang lebihan tisu lemak dan kulit Sesuai untuk wanita dengan saiz yang sangat besar dan sakit fizikal 2. Rawatan Bukan Invasif (Non-surgical Body Contouring) Guna teknologi seperti radiofrekuensi (RF) atau ultrasound (HIFU) Memecahkan tisu lemak secara perlahan Proses tanpa luka atau pembedahan, tapi perlukan beberapa sesi 3. Suntikan Lemak Terpilih Digunakan dalam beberapa kes untuk kontur dan simetri Dilakukan oleh doktor estetik yang berpengalaman ⚠️ Pastikan rawatan dilakukan di klinik berdaftar dan oleh pakar yang bertauliah di bawah Kementerian Kesihatan Malaysia (MOH). Perbandingan Pilihan Mengecilkan Payudara Kaedah Kesan Masa Nampak Hasil Kos Anggaran (RM) Senaman & diet Semula jadi 2–3 bulan < RM 500 (gym, makanan sihat) Rawatan RF/HIFU Non-invasif 4–8 sesi RM 500 – RM 3,000 Pembedahan Sangat ketara 1 minggu pemulihan RM 12,000 – RM 20,000 Soalan Lazim (FAQ) Q: Adakah senaman cukup untuk kecilkan payudara?A: Ia membantu jika dilakukan secara konsisten bersama pemakanan sihat. Hasilnya bergantung kepada genetik dan komposisi badan. Q: Bolehkah rawatan tanpa pembedahan benar-benar kecilkan saiz?A: Ya, ia boleh membantu bentuk dan saiz secara beransur, tetapi hasilnya lebih perlahan berbanding pembedahan. Q: Adakah rawatan ini menyakitkan?A: Kebanyakan rawatan bukan invasif tidak menyakitkan dan tidak memerlukan masa pemulihan. Q: Adakah pembedahan selamat?A: Ya, jika dilakukan oleh pakar bedah estetik berlesen dan dalam fasiliti yang diiktiraf MOH. Kesimpulan Ringkas Cara mengecilkan payudara termasuklah senaman, kawalan pemakanan, dan rawatan klinikal seperti RF atau pembedahan. Pilihan terbaik bergantung pada punca dan tahap ketidakselesaan. Dapatkan nasihat profesional sebelum memilih rawatan. Ingin Dapatkan Konsultasi? Jika anda sedang mempertimbangkan rawatan untuk saiz payudara yang besar, kami sedia membantu. Konsultasi awal bersama doktor bertauliah akan menentukan pilihan yang paling sesuai untuk anda — sama ada pendekatan semula jadi atau klinikal.
Hair Transplant Journey: M-Shaped Hair Loss Transformation & 4-Month Progress
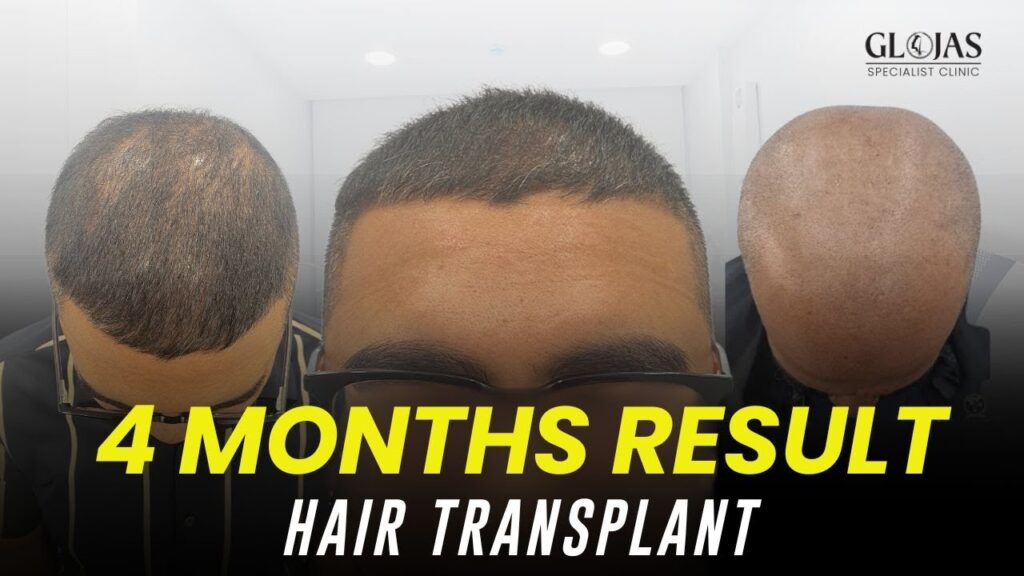
Experience a real-life hair transplant journey in this video, showcasing natural results, expert technique, and a major confidence boost. Whether you’re dealing with thinning hair, bald spots, or receding hairlines, this detailed look at the hair transplant process — from consultation to visible regrowth — will help you understand what to expect. Discover how advanced methods like SMART™ FUE deliver long-lasting and realistic outcomes. Ideal for anyone researching effective solutions for male pattern baldness or crown hair loss. #HairTransplant #FUEHairTransplant #HairRestoration #HairLossTreatment #SMARTFUE
Kajian Kes: Tanam Rambut – Hasil 6 Bulan dengan 2,500 Graft untuk Male Pattern Hair Loss Tahap 4 (Vertex)
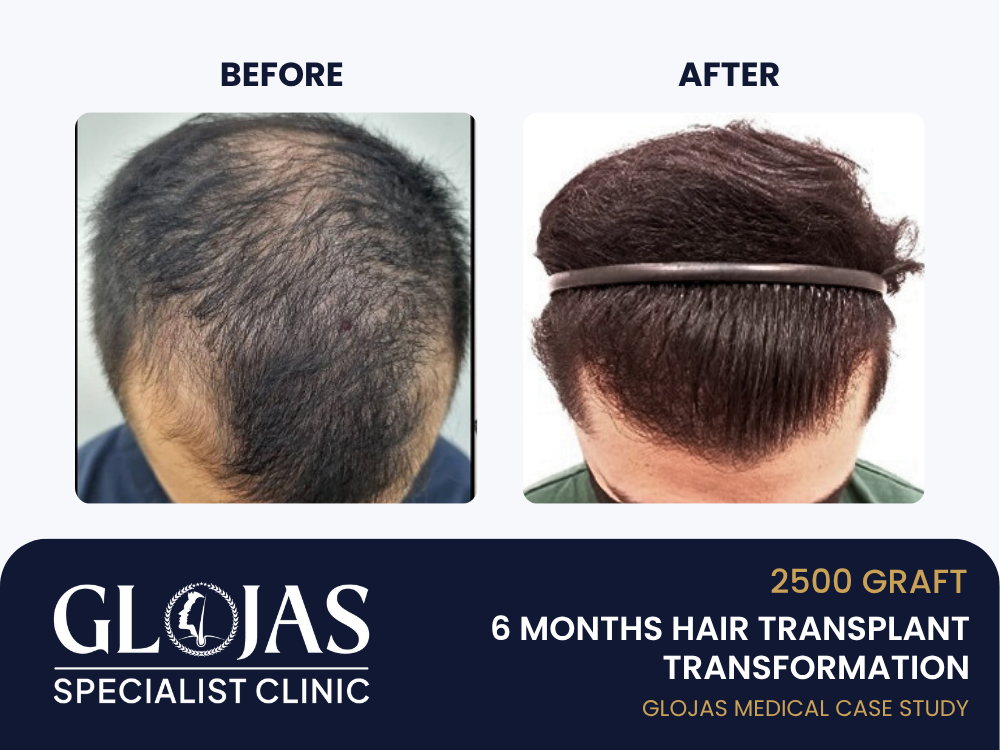
Keguguran rambut di kawasan crown (bahagian tengah belakang kepala) merupakan antara yang paling mencabar untuk dipulihkan. Ia sering dialami lelaki dalam lingkungan usia 30-an dan ke atas, serta memberi kesan besar kepada penampilan dan keyakinan diri. Kajian kes ini menyorot perjalanan seorang lelaki berusia 38 tahun yang menjalani tanam rambut menggunakan teknik SMART™ FUE bagi merawat keguguran rambut corak lelaki Tahap 4 (Norwood 4), terutamanya di kawasan vertex. Selepas hanya 6 bulan, perubahan ketara dapat dilihat, dengan pertumbuhan rambut yang lebih padat, semula jadi dan peningkatan keyakinan diri. Profil Pesakit Nama: En. D (dirahsiakan) Umur: 38 tahun Corak Botak: Norwood Tahap 4 – botak di kawasan crown, dan sedikit surut di garis hadapan Jenis Rambut: Beralun, sederhana tebal Kondisi Kulit Kepala: Sihat dengan aliran darah baik Matlamat Rawatan: Mengisi semula kawasan crown yang menipis dan hasilkan aliran semula jadi Masalah & Motivasi Pesakit En. D mengalami penipisan berterusan di kawasan crown selama lebih 5 tahun. Ia menjadi semakin jelas dalam gambar dan pencahayaan tertentu, menyebabkan beliau sering memakai topi atau menggunakan produk penebal rambut. Beliau pernah mencuba syampu dan suplemen, namun hasilnya tidak kekal. Oleh itu, beliau memilih penyelesaian kekal melalui tanam rambut SMART™ FUE. Kenapa Pilih SMART™ FUE? SMART™ FUE (Scalp Micro-Advanced Restoration Technique) merupakan evolusi daripada kaedah FUE biasa, menawarkan: Pengambilan graft yang tepat dan kurang trauma Kadar hidup graft lebih tinggi (sehingga 95%) Penanaman mengikut sudut & arah semula jadi, terutama di kawasan crown Tiada parut garis Pemulihan lebih cepat dan selesa Bagi kawasan crown yang memerlukan corak pusaran (whorl), teknik SMART™ FUE memberikan hasil yang lebih realistik. Perancangan Rawatan & Jumlah Graft – Hair Transplant Semasa sesi konsultasi, analisis digital dan pemeriksaan kulit kepala dilakukan. Crown beliau menunjukkan keguguran jelas dengan kulit kepala terdedah, manakala zon penderma (belakang kepala) padat dan sesuai. Pelan Pembahagian Graft: Jumlah keseluruhan: 2,500 graft Crown/vertex: 2,000 graft Tengah kepala (blending): 500 graft Tujuan utama ialah untuk mencipta corak pusaran semula jadi dan gabungkan dengan rambut asal di sekelilingnya. Ringkasan Hari Prosedur Tempoh Prosedur: 7 jam Anestesia: Bius tempatan Alat Punch: 0.8 mm mikro punch Alat Penanaman: Bilah sapphire Proses: Reka bentuk crown dan garis hadapan ditanda Bius diberikan 2,500 graft diambil dengan SMART™ FUE Graft disusun mengikut jenis: tunggal, berganda, bertiga Tapak penerima dibuka ikut arah pusaran Graft ditanam satu demi satu Pesakit melaporkan ketidakselesaan yang sangat minimum dan pulih dengan cepat. Garis Masa Pemulihan Hari 1–3: Sedikit bengkak dan kemerahan Minggu 1: Keruping kecil terbentuk dan tertanggal semula jadi Minggu 3: Rambut tertanam gugur sementara (shock loss) Bulan 3: Rambut baru mula tumbuh Bulan 4–5: Ketebalan dan liputan semakin meningkat Bulan 6: 70% hasil kelihatan – pusaran kembali terbentuk Hasil Selepas 6 Bulan Walaupun hasil penuh biasanya dicapai dalam 9–12 bulan, pada bulan ke-6, En. D sudah menunjukkan peningkatan besar dari segi ketumpatan dan penampilan crown. Zon Sebelum Rawatan Selepas 6 Bulan Crown/Vertex Kawasan botak luas, kulit kepala jelas 70% liputan semula, rambut tumbuh padat Garis Hadapan Surut ringan Blended kemas dengan kawasan tengah Keyakinan Diri Malu bergambar, pakai topi Berani dengan gaya rambut pendek semula Penjagaan Harian Guna spray penebal setiap hari Tiada – rambut kembali semula jadi Maklum Balas Pesakit “Dulu kawasan crown memang susah nak sorok. Sekarang saya sendiri lupa saya pernah botak. SMART™ FUE memang terbaik!” Pesakit sangat berpuas hati kerana corak pusaran semula jadi berjaya dikembalikan tanpa kelihatan palsu atau ditanam paksa. Penjagaan Lanjutan Tiada ubat oral diperlukan Gunakan syampu anti-DHT ringan Rawatan PRP setiap 6 bulan dicadangkan untuk kekuatan folikel Pemeriksaan seterusnya dijadualkan pada bulan ke-12 5 Soalan Lazim (FAQ) 1. Boleh ke nampak hasil dalam 6 bulan? ✅ Ya. Sekitar 60–70% hasil boleh dilihat dalam 6 bulan. Hasil penuh biasanya muncul antara bulan ke-9 hingga 12. 2. Susah ke tanam rambut di kawasan crown? Agak mencabar, kerana crown memerlukan corak pusaran semula jadi. Tapi dengan teknik SMART™ FUE, hasil boleh kelihatan sangat realistik. 3. Adakah saya perlu tanam rambut lagi di masa depan? Jika keguguran berterusan, anda boleh pertimbang sesi susulan dalam 2–5 tahun. Tapi untuk ramai pesakit, 1 sesi sudah mencukupi. 4. Boleh ke hasil tanam rambut tahan seumur hidup? ✅ Ya, kerana rambut dari zon penderma kebal terhadap hormon DHT, jadi ia kekal dan tumbuh seperti biasa. 5. Apa kelebihan SMART™ FUE berbanding FUE biasa? SMART™ FUE lebih tepat, kurang trauma, kadar hidup tinggi, dan sangat sesuai untuk kawasan kompleks seperti crown. Kesimpulan Kajian kes ini membuktikan bagaimana 2,500 graft menggunakan SMART™ FUE boleh memberikan hasil ketara dalam hanya 6 bulan untuk masalah botak crown Tahap 4. Pertumbuhan semula jadi, corak pusaran yang realistik dan peningkatan keyakinan adalah bukti kehebatan teknologi ini. Jika anda mengalami botak di kawasan belakang kepala, ini mungkin penyelesaian yang anda cari.
Case Study: Hair Transplant – 6-Month Results with 2,500 Grafts for Norwood 4 Vertex Hair Loss

Hair loss at the vertex (crown) is one of the most difficult areas to treat, often progressing with age and affecting the confidence of many men. This case study follows a 38-year-old male who underwent a SMART™ FUE Hair Transplant to restore density and coverage in the crown region due to Norwood 4 hair loss. After just 6 months, his results were already visibly impressive, providing physical transformation and renewed self-esteem. Patient Profile Name: Mr. D (identity anonymized) Age: 38 Hair Loss Pattern: Norwood 4 – Significant thinning at the crown (vertex) and mild recession at the hairline Hair Type: Wavy, medium thickness Scalp Condition: Normal, healthy blood supply Goal: Restore coverage to the crown and blend with existing hair for natural density Initial Concerns & Motivation Mr. D had been experiencing gradual thinning at the crown for over 5 years. It became more noticeable in photos and under strong lighting, which led him to cover the area with styling products or hats. He had tried shampoos and supplements with minimal success and finally decided to opt for a permanent solution through SMART™ FUE hair transplant. Why SMART™ FUE? SMART™ FUE (Scalp Micro-Advanced Restoration Technique) is a next-generation method of Follicular Unit Extraction (FUE) that delivers: Precision harvesting of grafts with minimal trauma Higher graft survival rate (up to 95%) Natural angling and placement — critical for crown whorl patterns No linear scarring Faster recovery and minimal discomfort Crown hair transplant requires a spiral pattern and careful density planning, making SMART™ FUE the ideal method for this case. Consultation & Graft Planning – Hair Transplant During the consultation, a digital trichoscopy and scalp assessment were performed. The crown has a clear thinning with exposed scalp and a disrupted whorl. His donor area, the back and sides of the scalp, showed strong density, ideal for extraction. Graft Distribution Plan: Total grafts: 2,500 Crown/vertex: 2,000 grafts Mid-scalp blending: 500 grafts The aim was to achieve a natural spiral pattern that mimicked his original hair flow, while gradually blending into the surrounding thinning zones. Procedure Day Overview Duration: Approx. 7 hours Anaesthesia: Local Punch Tool: 0.8 mm micro-punch Implantation Tool: Sapphire blade for recipient site creation Procedure Steps: Hairline and crown design marked Local anesthesia administered 2,500 grafts extracted using SMART™ FUE Follicles sorted (single, double, triple) Recipient sites are prepared following the crown’s natural spiral Grafts implanted with careful angling Mr. D reported minimal discomfort and resumed light activity the next day. Recovery & Growth Timeline Days 1–3: Mild swelling and redness in the crown Week 1: Tiny scabs formed; patient followed post-op cleaning protocol Week 3: Shedding of transplanted hairs (shock loss phase) Month 3: New hair follicles began sprouting Months 4–5: Increased density and volume Month 6: Visible coverage and whorl pattern formation 6-Month Results Though full results typically take 9–12 months, Mr. D already had a dramatic improvement in crown density at the 6-month mark, and no longer felt the need to cover his head. Area Before 6 Months After Crown Large bald spot, exposed scalp 70% coverage restored with visible volume Hairline Mild recession, stable Blended smoothly with the crown Confidence Reluctant in photos, wore hats Comfortable with short hairstyles Styling Needs Thickening sprays daily None – natural hair volume returned Patient Feedback “The crown was always the hardest part to hide. Now I forget I even had that bald spot. The SMART™ FUE hair transplant was the best decision I’ve made for myself.” Mr. D was especially impressed with the natural whorl created, which matched his previous growth pattern almost identically. Follow-Up & Maintenance No oral medication prescribed, but the patient opted for DHT-blocking shampoo PRP therapy is suggested every 6 months to support long-term follicle health Next follow-up scheduled for Month 12 to assess full maturity of grafts 5 Frequently Asked Questions (FAQ) 1. Is 6 months enough to see results? Partial results are visible at 6 months, typically around 60–70% of the final density. Full results are seen by 9–12 months. 2. Can transplanted hair grow in a spiral like the crown? Yes. With SMART™ FUE, surgeons recreate the natural whorl pattern of the crown by carefully angling each follicle during implantation. 3. Is the crown harder to treat than the front? Yes, the crown has unique growth patterns and usually requires more grafts to achieve full coverage. But with proper technique, results can be excellent. 4. Will I need more grafts in the future? If hair loss progresses, some patients opt for a touch-up session in 2–5 years. However, with stable hair loss and a good donor supply, one session may suffice. 5. Is SMART™ FUE better than traditional FUE? ✅ Yes. SMART FUE offers higher precision, a better survival rate, and less trauma, especially in complex areas like the crown. Conclusion This case demonstrates how 2,500 grafts with SMART™ FUE can deliver transformative results in only 6 months, especially for those suffering from Norwood 4 vertex hair loss. The natural swirl pattern, density, and confidence regained by Mr. D are a testament to what’s possible with modern hair restoration techniques. If you’ve been hiding your bald spot or feel limited by thinning in the crown, SMART™ FUE could be your answer — and this case proves that meaningful results don’t have to take a full year to appear.
Microneedling Before and After – Real Results & Photos, Benefits & What to Expect
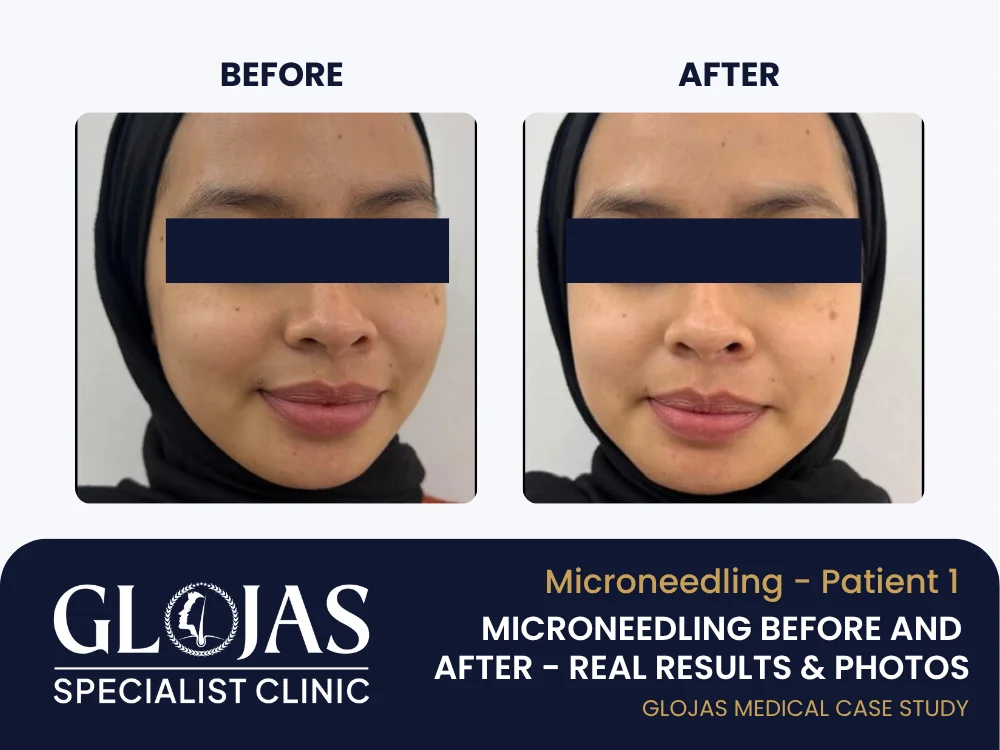
Microneedling Before and After Microneedling, also known as collagen induction therapy, is one of the most popular non-surgical treatments for improving skin texture, acne scars, wrinkles, and more. It works by using tiny needles to create controlled micro-injuries, stimulating the body’s natural healing response and boosting collagen production. If you’re considering this treatment, it’s helpful to understand what happens before, during, and after a session—and what kinds of results you can realistically expect. What Is Microneedling? Microneedling is a minimally invasive skin treatment that involves a device with fine needles (like Dermapen or SkinPen) to create micro-channels in the skin. These channels stimulate: Collagen and elastin production Cell turnover and healing Deeper absorption of serums (like PRP, vitamin C, or peptides) It’s used for treating various concerns including: Acne scars Enlarged pores Fine lines and wrinkles Hyperpigmentation Stretch marks Uneven skin tone or dullness What to Expect Before Microneedling 1. Pre-Treatment Consultation At GLOJAS Clinic, we start with a skin assessment to determine your concerns, skin type, and eligibility. We may recommend combining microneedling with PRP (Platelet-Rich Plasma) for enhanced results. 2. Pre-Treatment Guidelines Avoid sun exposure, exfoliants, and retinol for 3–5 days Stay hydrated Stop using blood thinners if advised by your doctor Cleanse skin and arrive makeup-free What Happens During the Procedure? A topical numbing cream is applied for comfort (30–45 mins) A microneedling device is passed across the treatment area Serums (like PRP, hyaluronic acid, or growth factors) are applied to penetrate deeply through micro-channels The procedure takes about 30–60 minutes, depending on the area You may experience a mild prickling or heat sensation, but pain is minimal and well-tolerated. Microneedling Aftercare & Recovery Timeframe What to Expect 0–24 hours Redness, tightness, mild swelling (like sunburn) Day 2–3 Light peeling or flaking may begin Day 4–7 Skin heals and smooths; makeup may be worn Week 2–4 Visible results appear (texture, tone improve) Week 4+ Continued collagen production, scar reduction Aftercare Tips: Avoid sun exposure, sweating, and harsh products for 3–5 days Use gentle cleanser and rich moisturizer Apply broad-spectrum sunscreen daily Avoid active ingredients (retinoids, AHAs) until skin fully recovers Microneedling Before and After Results Visible Improvements Include: Smoother skin texture Smaller pores Reduced acne scars and pitting Fewer fine lines and creases More even skin tone and glow Most clients see improvement after the first session, with optimal results after 3–5 sessions, spaced 4–6 weeks apart. 📸 Before and after results vary by skin type, concern, and whether PRP is combined. Who Is Microneedling Best For? Microneedling is safe for all skin tones and best suited for those with: Mild to moderate acne scarring Early signs of aging Pigmentation or sun damage Stretch marks Dull or uneven skin tone It’s not recommended for those with active acne, eczema, open wounds, or keloid tendencies (without clearance from a doctor). Combine Microneedling With PRP or Laser for Better Results At GLOJAS, we often combine microneedling with: PRP therapy – Accelerates healing and boosts collagen Fractional CO2 laser – For deeper scars or severe texture issues Chemical peels – To target pigment while rejuvenating skin Frequently Asked Questions (FAQs) 1. How long does it take to see results?You’ll see smoother skin in 1–2 weeks, with continued improvements over 1–3 months as collagen rebuilds. 2. Is microneedling painful?A numbing cream is applied beforehand. Most people feel only mild discomfort or heat. 3. How many sessions do I need?Most patients need 3–5 sessions for best results, spaced 4–6 weeks apart. 4. Can I wear makeup after microneedling?Avoid makeup for at least 24–48 hours post-treatment. 5. Is there downtime?Mild redness and flaking are common for 2–3 days, but most patients resume light activities the next day. Book Your Microneedling Consultation at GLOJAS Ready to experience the before and after transformation of microneedling? At GLOJAS Aesthetic Clinic, we offer doctor-led microneedling treatments with or without PRP for safe, effective, and natural-looking results. 📍 Desa Sri Hartamas, Kuala Lumpur📞 +603 6211 5555 | WhatsApp +6012 989 1915🌐 www.glojasaesthetic.com If you’re researching microneedling before and after results, you’re not alone. Many people turn to microneedling as a non-surgical solution for skin concerns like acne scars, large pores, and uneven tone. The visual transformation seen in microneedling before and after images often shows smoother texture, brighter skin, and reduced scarring. At GLOJAS Clinic, we’ve documented countless microneedling before and after cases to help patients understand what to expect and how long it takes to see visible results. The best part about microneedling before and after progress is that collagen continues to rebuild for weeks after each session. Whether you’re treating acne scars or signs of aging, the microneedling before and after difference is noticeable even after the first treatment. Many patients explore microneedling before and after photos to decide on combining it with PRP or laser. If you want proven results, real microneedling before and after transformations can help set realistic expectations.
Blackheads: Medical Guide to Causes, Safe Treatments & Proven Prevention
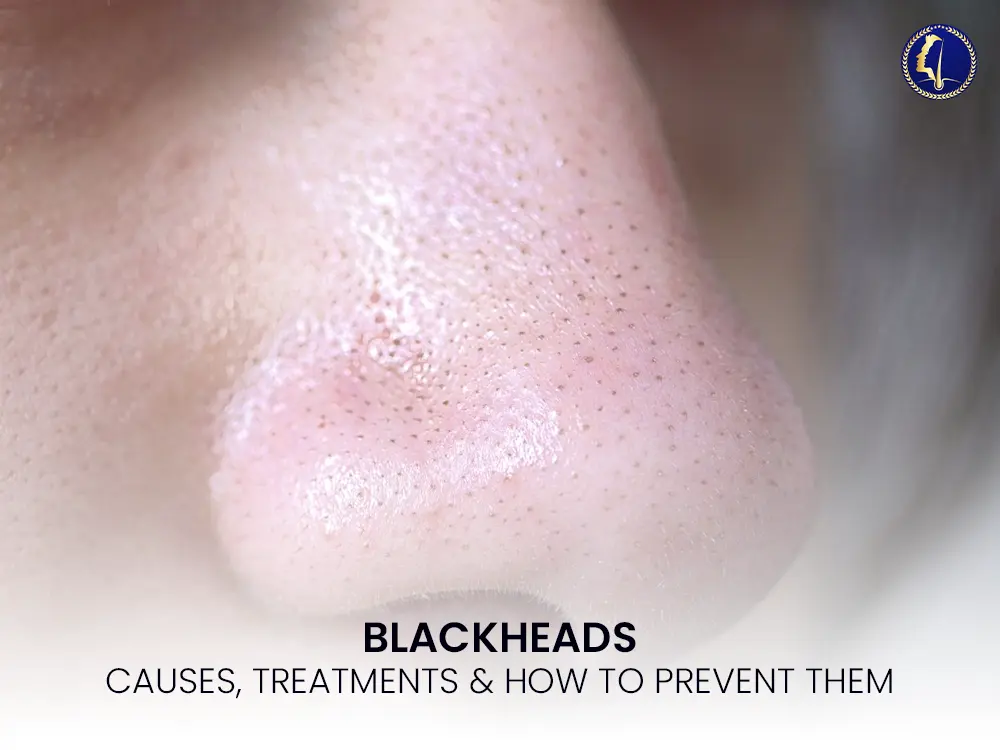
Blackheads, also known as open comedones, are one of the most common types of acne. These small, dark bumps form when clogged pores are exposed to air and oxidize, turning black. While they’re harmless, they can be persistent, especially in oily or acne-prone skin. In this blog, we’ll explore what causes blackheads, how to treat them effectively, and tips to prevent future breakouts. What Causes Blackheads? Blackheads form when dead skin cells, sebum (oil), and sometimes bacteria get trapped in a pore. Unlike whiteheads, which are closed, blackheads stay open—making the trapped material oxidize and darken when exposed to air. Common triggers include: Excess oil production Hormonal changes (puberty, menstruation, pregnancy) Poor skincare habits Using comedogenic (pore-clogging) products Environmental factors (pollution, humidity) Where Do Blackheads Usually Appear? Blackheads typically appear on oilier areas of the skin such as: Nose Forehead Chin Cheeks Back and shoulders These regions have more active sebaceous glands, making them more prone to clogged pores. Best Treatments for Blackheads 1. Salicylic Acid Cleansers A beta hydroxy acid (BHA) that exfoliates deep within the pores and helps remove excess oil and dead skin. 2. Retinoids (Tretinoin or Adapalene) Vitamin A derivatives that speed up cell turnover and keep pores clear. Often used in prescription or over-the-counter formulations. 3. Exfoliation (Chemical Peels) Regular AHA or BHA exfoliation helps prevent dead skin buildup that contributes to blackheads. 4. Extraction Treatments Performed professionally, this involves manual removal of blackheads with sterile tools—often part of a facial or acne therapy. 5. Carbon Laser Peel or Hydrafacial Advanced in-clinic treatments like the carbon laser peel deeply cleanse pores, reduce oil, and improve skin tone. 6. Clay Masks Kaolin or bentonite clay helps absorb oil and draw out impurities from the skin. Can You Squeeze Blackheads? It’s tempting—but don’t. Squeezing blackheads at home can cause: Inflammation Scarring Worsening of acne Bacterial infection Always consult a licensed aesthetician or dermatologist for safe extraction. Tips to Prevent Blackheads Use a gentle cleanser with salicylic acid Exfoliate regularly with chemical exfoliants Avoid heavy or greasy skincare and makeup Remove makeup before bed Don’t over-wash or scrub—this can trigger more oil production Visit a skin clinic for monthly facials or peels When to See a Professional If blackheads are persistent, inflamed, or affecting your confidence, it’s time to consult a professional. At GLOJAS Aesthetic Clinic, we offer: Acne facials Carbon laser peel Medical-grade chemical peels PRP for acne scarring Sebum control skincare systems Our doctors and licensed aestheticians will guide you with a personalized treatment plan tailored to your skin type. FAQs About Blackheads 1. Are blackheads a form of acne?Yes. Blackheads are a type of non-inflammatory acne known as open comedones. 2. Do blackhead strips work?They may remove surface debris but don’t treat the underlying cause. Results are temporary. 3. Can oily skin cause blackheads?Yes, excess oil production is a major contributor to clogged pores and blackheads. 4. How often should I exfoliate?2–3 times per week with a gentle AHA or BHA product is ideal for most skin types. 5. Will blackheads go away on their own?Some may resolve naturally, but most require proper cleansing or treatment to fully clear. Clear Your Skin with Expert Blackhead Treatment Ready to treat blackheads and reveal smoother skin? Book a skin consultation at GLOJAS Aesthetic Clinic In Kuala Lumpur, where we combine expert care with medically proven treatments to help you achieve long-lasting clarity and confidence. 📍 Desa Sri Hartamas, Kuala Lumpur📞 +603 6211 5555 | WhatsApp +6012 989 1915🌐 www.glojasaesthetic.com
Hair Transplant in Malaysia | 3,500 Grafts for Diffuse Pattern Balding | 4-Month Update
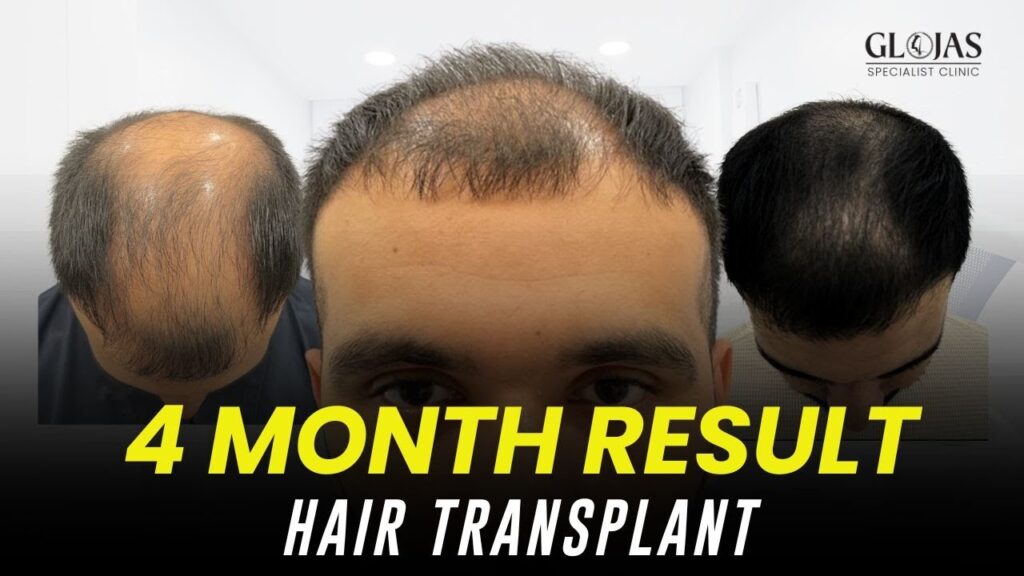
Thinking about a hair transplant but not sure what the real results look like? Watch this inspiring transformation from a real patient who underwent a professional hair transplant procedure using advanced techniques. See before-and-afterfootage, understand what to expect, and hear how the experience changed his confidence and appearance. Whether you’re dealing with male pattern baldness, thinning hair, or receding hairlines, this video is a must-watch for anyone considering a natural-looking and permanent solution through hair restoration. Subscribe for more real results, expert advice, and behind-the-scenes clinic experiences in the world of modern hair transplants. #HairTransplant #HairRestoration #BeforeAfterHair #FUEtransplant #HairLossSolution
Kajian Kes: Tanam Kening FUE – Hasil Selepas 4 Bulan dengan 155 Graft untuk Parut
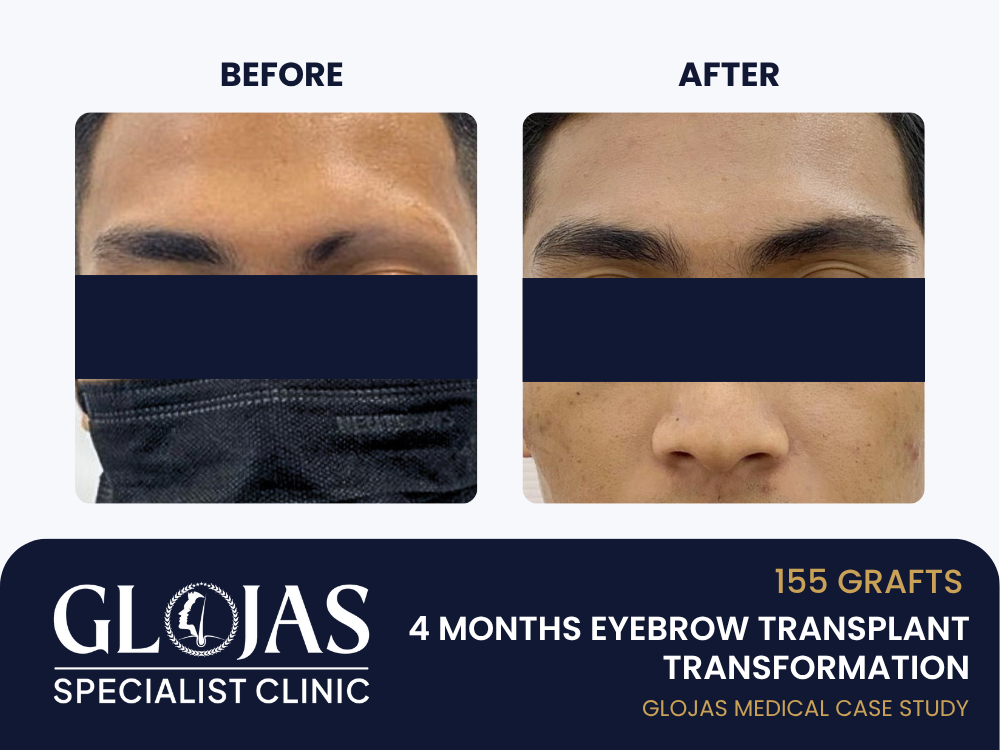
Kening memainkan peranan penting dalam ekspresi wajah — lebih-lebih lagi bagi lelaki, di mana bentuk dan ketegasan kening mempengaruhi rupa dan personaliti. Namun, kecederaan seperti parut akibat kemalangan boleh memberi kesan ketara kepada penampilan dan keyakinan diri. Kajian kes ini mengisahkan seorang lelaki berumur 34 tahun yang menjalani tanam kening menggunakan teknik SMART™ FUE bagi menutup parut pada kening kanan akibat percikan bahan kimia semasa bekerja. Selepas hanya 4 bulan, beliau menunjukkan peningkatan ketara dari segi bentuk, pertumbuhan rambut dan keseimbangan wajah — tanpa rawatan susulan yang rumit. Latar Belakang Pesakit Nama: En. B (dirahsiakan) Umur: 34 tahun Jantina: Lelaki Masalah Utama: Parut jelas pada bahagian tengah kening kanan tanpa pertumbuhan rambut Punca: Kecederaan akibat percikan bahan kimia semasa bekerja di kilang Matlamat: Menutup parut dan membentuk semula kening dengan rambut yang kelihatan semula jadi Sebelum menjalani rawatan, En. B menggunakan pensel atau membiarkan sahaja kawasan kening yang kosong, walaupun tidak seimbang. Beliau inginkan penyelesaian kekal dan mudah dijaga. Konsultasi & Penilaian Awal – Tanam Kening Dalam sesi konsultasi, doktor menilai tahap parut dan kesesuaian prosedur: Parut: Telah matang dan stabil, dengan aliran darah mencukupi Zon penderma: Bahagian belakang kepala – sihat dan sesuai untuk ambilan graft Jenis kulit: Sederhana cerah, tiada sejarah keloid Reka bentuk kening: Fokus pada bentuk maskulin & keseimbangan wajah Setelah pemeriksaan lengkap, jumlah 155 graft disyorkan untuk mengisi bahagian parut dan membentuk semula kening tanpa mengubah wajah secara drastik. Kenapa Pilih SMART™ FUE? SMART™ FUE (Scalp Micro-Advanced Restoration Technique) adalah pilihan terbaik untuk kes yang melibatkan kawasan parut pada muka, seperti: Kadar hidup graft lebih tinggi walaupun di kulit berparut Implantasi mikro tepat ikut arah pertumbuhan rambut Tiada parut tambahan Kurang trauma pada kulit Sesuai untuk zon sensitif seperti kening Teknik ini meningkatkan peluang pertumbuhan semula rambut pada kawasan parut dengan hasil yang semula jadi. Ringkasan Prosedur Tempoh: 3 jam (pesakit keluar hari sama)Jumlah Graft: 155 (kebanyakannya unit rambut tunggal)Zon Penderma: Belakang kepalaZon Penerima: Bahagian tengah kening kanan (berparut) Langkah Demi Langkah: Bius tempatan pada kulit kepala & kening Ambil 155 graft dengan punch mikro (0.7 mm) Graft disusun mengikut jenis rambut tunggal Tapak penerima dibuka mengikut arah pertumbuhan kening Tanam satu demi satu untuk hasil semula jadi Pesakit tidak mengalami ketidakselesaan besar dan boleh pulang terus selepas rawatan. Pemulihan Selepas Prosedur Hari 1–3: Kemerahan dan sedikit bengkak pada kawasan kening Hari 4–7: Keruping halus terbentuk dan akan tertanggal sendiri Minggu 3: Rambut mula gugur sementara (shock loss) – normal Bulan 2–3: Pertumbuhan awal kelihatan di zon parut Bulan 4: Kawasan parut mula tertutup dengan pertumbuhan baru Hasil Selepas 4 Bulan Selepas 4 bulan, perubahan ketara dilihat pada kening dan rupa keseluruhan wajah: Ciri Sebelum Rawatan Selepas 4 Bulan Kening Tengah Parut licin tanpa rambut Dilitupi rambut baru secara semula jadi Simetri Kening Tidak sekata, tidak seimbang Garis dan bentuk kembali seimbang Penjagaan Harian Perlukan pensel atau biarkan kosong Tiada keperluan solekan Keyakinan Diri Malu dan elak kontak mata Lebih yakin, ekspresi wajah lebih terbuka Maklum Balas Pesakit “Saya tak sangka kesan parut kecil ini boleh beri impak besar pada rupa. Kini saya rasa lebih tenang bila bercakap dengan orang tanpa perlu sembunyi.” En. B gembira kerana rambut baru tumbuh mengikut arah kening asal dan parut tidak lagi kelihatan jelas. Penjagaan Jangka Panjang Potongan ringan mungkin perlu setiap 2–4 minggu (kerana berasal dari kulit kepala) Hasil kekal selepas folikel stabil Tiada rawatan lanjut diperlukan melainkan ingin tambah ketumpatan Parut terus dilitupi kecuali jika dicukur 5 Soalan Lazim (FAQ) 1. Boleh ke rambut tumbuh atas parut? ✅ Ya — jika parut matang dan aliran darah mencukupi, tanam rambut SMART™ FUE boleh merangsang pertumbuhan rambut di kawasan tersebut. 2. Berapa banyak graft diperlukan untuk tanam kening? Untuk parut kecil seperti kes ini, 100–200 graft selalunya mencukupi. Tanam semula sepasang kening penuh biasanya memerlukan 250–400 graft. 3. Adakah rambut baru akan serasi dengan bulu kening asal? Ya. Graft diambil dari zon rambut yang bertekstur halus, dan ditanam mengikut sudut pertumbuhan semula jadi. 4. Adakah perlu sesi susulan? Tidak semestinya. Tetapi sesetengah pesakit memilih untuk tambah ketumpatan selepas 12 bulan untuk hasil lebih padat, terutama di kawasan parut. 5. Adakah hasilnya kekal? ✅ Ya. Selepas folikel stabil, rambut baru akan tumbuh kekal — cuma perlu dipotong ringan secara berkala seperti kening biasa. Kesimpulan Kajian kes ini membuktikan bahawa teknik SMART™ FUE untuk tanam kening berkesan walaupun di kawasan berparut atau cedera. Dengan hanya 155 graft dan 4 bulan pemulihan, En. B berjaya dapatkan semula bentuk dan tekstur kening yang seimbang — sekaligus meningkatkan keyakinan dan ekspresi wajah secara semula jadi. Jika anda mengalami parut pada kening akibat kemalangan atau prosedur lama, tanam kening boleh menjadi penyelesaian kekal, selamat dan kelihatan semula jadi.
